Friday, 19 November 2010

Post 9: Post-Production Report

We connected our camera to the edit suite and captured our film. We then created our Logging Rushes table on a word document and went through and wrote down each scene, shot, take, wrote a description for each shot and whether we were going to keep it or not.


When we'd finished doing the logging rushes we started to edit. We used the tools to cut the clips we wanted. We used our logging rushes table to help us find where each clip we wanted to use started and ended. We then used the cut clip and put it in the timeline. We did this until all our clips were together in a rough cut in chronological order.
                                                                                 

In Code
Out code
Scene
Shot
Take
Description
Yes/no
00:00:03:10
00:00:11:05
1
1
1
Chloe walking into the doctors surgery
yes
00:00:12:02
00:00:33:11
2
1
1
Chloe walks into the room
No
00:00:33:12
00:01:11:24

1
2
Chloe  walks into the room
No
00:01:14:16
00:01:50:09
1
3
Chloe  walks into the room
Yes
00:01:51:17
00:02:03:20
2
1
Chloe speaks to doctor leaves room
Yes
00:02:04:13
00:02:10:17
3
1
Doctor speaks to Chloe
No
00:02:12:17
00:02:18:20

2
Doctor speaks to Chloe
No
00:02:20:06
00:02:47:05
3
Doctor speaks to Chloe
Yes
00:02:47:05
00:02:52:06
4
1
Doctors Close up
Yes
00:04:25:24
00:04:32:10
5
1
Chloe Close up
Yes


We then played the rough cut and went through and made sure it all made sense and sounded correct. We had to edit parts out, for example if there was a pause before the dialogue begun then we cut it out so the whole clip flowed. After putting all the clips together we then edited the sound, making sure it wasnt too loud or too quiet and the continuity was ok. We used the fading markers at the beginning and end of every clip, this helped the sound flow throughout the clips.

We then went through the music we had on the computer to see if we could find a piece we could use in the footage. We wanted to add a piece of sad music at the point where Chloe recieves the bad news and also to have some theme music at the beginning and end of the footage. We couldn't find any on the computer that were suitable for our piece so we decided that we would add our own.

After we had finished the sound levels we added in some effects. We added in a cross fade effect at the beginning and end of the footage. We then created some opening titles and  end credits. We also put a cross fade effect on the start and end of the opening titles. We gave the opening titles a blue background and writing.

Unfortunatley we ran out of time to add the music that we wanted onto our clip so our final piece of footage didnt have any music. We also changed the colours of the opening titles and end credits so that they matched each other. Also when we first did the titles there was a shadow behind the writing which made it quite difficult to read, so we chose a different font style so that we no longer had a shadow there.
    
This was the stage where we decided what music to add in.
                            
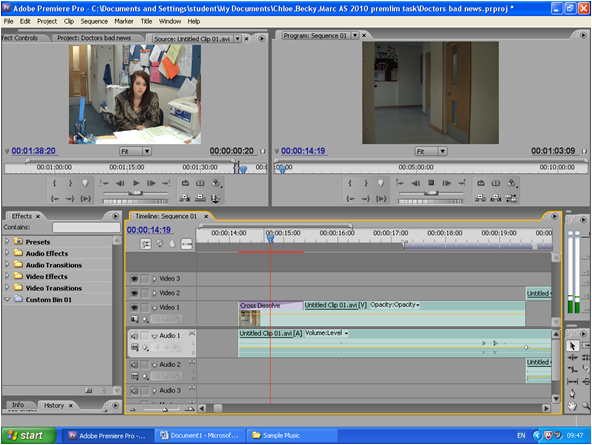
This shows where we added in the cross dissolve


This shows the fading effects.


This shows how we created the Opening Titles


This shows how we created the end credits.


Tuesday, 2 November 2010

Post 8: Pre-Production Report

Pre-Production Report:
The first time we tried to start filming, we couldnt get the key to the office, so we had to rearrange a date to go back so we could film. When it came to filming the only problems we had was that from on camera angle there was a couple of blue trays stacked on top of each other which we had to move as they blocked Marc's face.

The filming went quite well and we got all the shots we needed from both angles. There was one close up of Chloe which we didnt get time to film, so we needed to rearrange another date to go back to the office so we could get the close up. We worked well together as a team as we came up with an idea for the shooting. I would push the button to record, show Chloe and Marc I was counting to three on my fingers and then say action. We counted to three before ending the shot as well. This made it easier as Chloe was outside and Marc was inside for the beginning so they could both listen in.

When we watched it backed we focused on looking at the amount of head room each shot had and how much spare space there was around the characters. We made sure we had used the correct shot size according to our storyboard and shot list. We checked that all the shots we had were suitable for the final edit. We came across some problems with our shots as some of the close ups we wanted we're actually medium close ups instead.

Sunday, 31 October 2010

Post 7: Additional Pre-Production Documentation

Location Recce:


Risk Assessment:


Shooting Schedule:


Mise-en-scene Description:
Set design/Location:
For our preliminary task we have set it in one of the offices in the school. We chose this particular office because it is quite small and looks a bit like a doctor’s office. The office has blue carpet and cream walls and there is a big enough gap between the door and the desk which we needed for one of our shots. There was a desk at the back of the room which was what we needed to create the feel of a doctor’s office. There were two windows a fire exit door behind the desk which gave us some natural lighting.
Lighting:
The two windows and fire exit door at the back of the room gave us some natural light. There was also some light coming through the door at the front of the office from the corridor outside. There was also some artificial lighting as there were three flat lights on each side of the ceiling. We used the artificial lighting when we were filming as the natural light wasn’t bright enough on that day.
Character Movement:
At the beginning of the filming, CHLOE enters the room and walks towards the desk and sits on the chair. MARC is already sitting behind the desk; he remains seated there throughout the film. At the end of the dialogue CHLOE gets up and walks towards the door and slams it shut behind her. It then cuts to the credits. We chose this sort of character movement as it is quite natural and realistic for a doctor’s conversation with a patient.
Props:
We had a desk with a computer and papers on it. There was two chairs, one either side of the desk, one for the doctor and one for the patient. We used this layout and these props as it helped create a realistic setting of a doctor’s office.
Costume:
MARC: - Black trousers, striped shirt with a tie and a dark cardigan. Black smart shoes.
CHLOE: - Fur coat, Peach top, Leggings and tanned boots.
We chose these costumes as they seemed quite realistic. As MARC was the doctor he needed to look smart and professional and because CHLOE was a patient she needed to look like a casual patient.
Hair and Make-Up:
MARC: hair, N/A and make-up N/A
CHLOE: Natural looking hair and make-up
We chose to have the hair and make up this way as we wanted to make it realistic. CHLOE was a normal patient on an average day so she needed to look natural and MARC was a professional doctor so no make up was needed.


Cast, Crew, Equipment and Props List:

Tuesday, 19 October 2010

Post 6: Shot List & Storyboard

 This is our storyboard:


This is our shot list.


Post 5: Jump cuts, Over-the-shoulder shots, Cutaways & Point of view shots

Jump Cuts:
It is when two consequtive shots are taken from different camera positions.This makes it look as if the person or object has 'jumped' to a different position which doesn't look right.
http://en.wikipedia.org/wiki/Jump_cut


Over-The-Shoulder Shot:
This is a shot of a person or an object over the shoulder of another person, the back of the shoulder and head of this person is used in the shot.
http://en.wikipedia.org/wiki/Over_the_shoulder_shot


Cutaway:
A cutaway shot is a shot of something other than the main subject. It could be a different part of the subject for example the shot could show the persons hands instead of their face.
http://www.mediacollege.com/video/shots/cutaway.html


Point of View Shot:
This shot shows what the subject is looking at. The camera acts as the person.
http://en.wikipedia.org/wiki/Point_of_view_shot


This picture is an example of a jump cut.


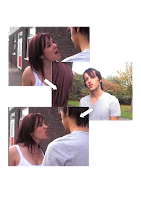
This picture is an example of an over-the-shoulder shot.


 This picture is an example of a cutaway shot.


 This picture is an example of a point of view shot.

Post 4: Script Writing

This is our groups annotated script.
We have shown who thought up some of the part and why we chose certain phrases and words.


There could have been possible continuity issues with our script when filming. For example when Chloe enters the room and sits down, we would have to make sure that from each camera set up she sat down in the same position so that when we edit them together, they match.

Monday, 27 September 2010

Post 3: Continuity

What is continuity?
http://www.google.co.uk/search?hl=en&rls=com.microsoft:en-US:IE-SearchBox&rlz=1I7GGLL_en&defl=en&q=define:continuity&sa=X&ei=_eOgTP6iNuHX4wb725jUDQ&ved=0CBUQkAE
www.waikato.ac.nz/film/handbook/glossary.html
analytical editing: analysing a scene into a series of shots and applying rules to ensure that the audience understands the connections between them.
It makes sure that the scene makes sense and flows when it is watched back.

What is the 180 degree rule/Crossing the line?
http://en.wikipedia.org/wiki/180_degree_rule
It is a basic rule when filming, it makes sure that the two, or however many characters, have the same position in the scene. For example if a man and a woman are arguing, during a shot reverse shot, the lady should always be on the same side, as should the man. If the camera goes past the 180 degree rule, it is called crossing the line.


What is Shot Reverse Shot?
http://en.wikipedia.org/wiki/Shot_reverse_shot
It is where the camera goes from looking at one person from the other person perspective, to going to the other and then back. For example if A and B are having a conversation, the camera will shot A from over B's shoulder and then using the 180 degree rule, go to looking at B from over A's shoulder.


What is Match on Action?
http://en.wikipedia.org/wiki/Cutting_on_action
Match on action is where the production is cut from one shot to a different view which matches the action from the first shot. Match on action gives an impression of continous time between the shots even if they were shot hours apart.